ShopDreamUp AI ArtDreamUp
Deviation Actions
Daily Deviation
Daily Deviation
April 29, 2010
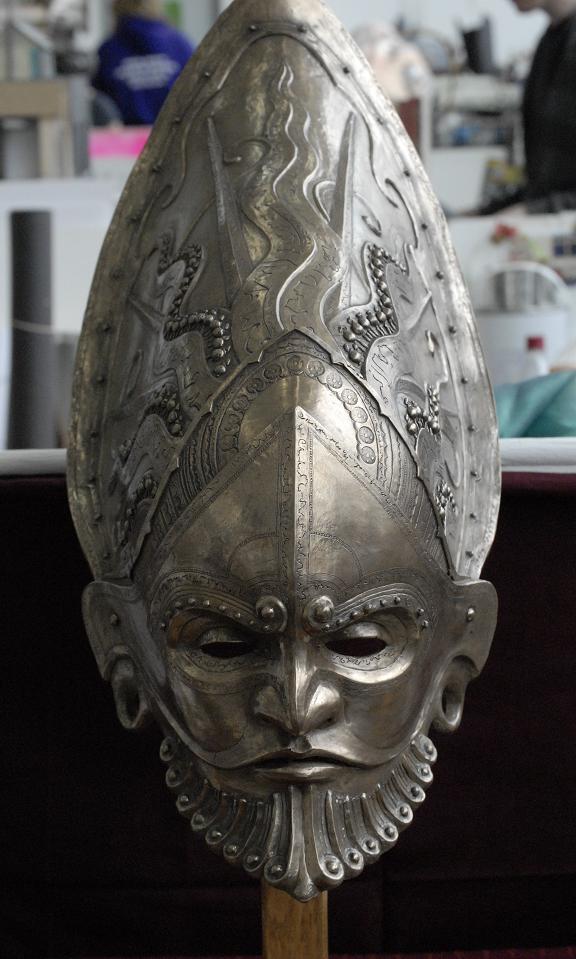
I really like the variety and combination of different styles and particularly civilization designs that have gone into creating Frontshot of ceremonial helmet by ~danielokeefe. The detail likewise has a very nice mix of both fine and delicate as well as broad and prominent.
Featured by Thebuild
Suggested by adeelquick


Description
Okay, this is a ceremonial helmet I made (Smile)") I'm currently studying Character creation and technical effects at University of Hertfordshire, I'm in the second year and this was for a negotiated project where the student pitches an idea to the tutor. I wanted to make a piece of ceremonial armour, as a piece of set dressing for a fantasy film. I wanted it to look like a museum piece. I designed it myself; you can see the designs for it in my scrapbook section!
I'm currently studying Character creation and technical effects at University of Hertfordshire, I'm in the second year and this was for a negotiated project where the student pitches an idea to the tutor. I wanted to make a piece of ceremonial armour, as a piece of set dressing for a fantasy film. I wanted it to look like a museum piece. I designed it myself; you can see the designs for it in my scrapbook section!
In order to create the mask helmet I first took a head cast of one of my class mates. I then built up an armature on top of the head cast in the shape of helmet I wanted. I used thick armature wire and chicken wire, securing the wire onto the head with staples.
I sculpted in wet clay; it took me about 5 weeks to sculpt. When it was done I walled up the edges with clay and plaster bandage, and poured silicone over the top. When it had gone off I cut dove tails into the edge of the silicone to work as keys for the fibreglass jacket. I built a wall of clay on top of the silicone running down the middle of the piece and used French polish to seal it so the moisture in the clay wouldn’t stop the gel coat from going off.
I created a fibreglass jacket, using one layer of gel coat resin, followed by one layer of fibre glass tissue, then two layers of matt (300gsm) and then a final layer of fibreglass tissue. I waited for the gel coat layer to go off before laying up the tissue and matt, and I used resin to wet it. While the fibreglass was in its green stage I cut the edges back to save me having to use a power tool later.
When this side had gone off, I removed the central wall of clay, and sealed the fibreglass flange that would be exposed to the next section of fibreglass. I sealed it with PVA and Macwax. I repeated the process for layering up on the other side. When both sides had gone off I drilled holes in the flange and removed both parts of the fibre glass jacket and the silicone sleeve from the sculpt. I cleaned the mould and pieced it back together ready for casting.
I wanted a bronze finish on this cast so I pasted a mixture of bronze powder and gel coat into the mould. After this had gone off I put fibre glass chopped strand into the difficult areas and then layered up one tissue, two matt and one tissue.
When it had gone off I removed it from the mould and trimmed the edges with a Vibrosaw. I filled in any imperfections with bronze powder and gel goat. To expose the bronze powder you have to wire wool the surface down. When the surface has a metallic finish to it, I used the buffing machine to make the surface shiny.
I secured a square piece of steel in the back for the mount with P40, and then spray painted the back dark brown. That’s about it. If you have any questions or are interesting in buying a cast of it let me know! I hope you like it!
Danny
Image size
576x959px 104.99 KB
Make
NIKON CORPORATION
Model
NIKON D200
Shutter Speed
10/2500 second
Aperture
F/8.0
Focal Length
55 mm
ISO Speed
1250
Date Taken
Sep 6, 2007, 6:14:17 AM
© 2010 - 2024 danielokeefe
Comments111
Join the community to add your comment. Already a deviant? Log In
really fantastic